

Taping the handle of a hockey stick is essential. It improves grip and control.
A well-taped handle can make a big difference in your game. It offers better handling, reduces wear on gloves, and adds a personal touch to your stick. Whether you’re new to hockey or a seasoned player, knowing how to tape your stick properly is crucial.
This guide will walk you through each step, ensuring your stick is ready for action. Let’s dive into the process and make your hockey experience even better!

Credit: www.youtube.com
Choosing The Right Tape
Choosing the right tape for your hockey stick handle is crucial. It affects your grip and control. Good tape can enhance your gameplay and make you more comfortable on the ice.
There are different types of tape available. Each type has its own benefits and drawbacks. Understanding these can help you make the right choice.
Types Of Tape
There are two main types of tape used for hockey sticks: cloth tape and friction tape. Cloth tape is the most popular. It offers a solid grip. Friction tape is sticky on both sides. It provides extra grip but can wear out faster.
Pros And Cons
Cloth tape is durable and easy to use. It gives a good balance between grip and comfort. It’s also available in various colors.
Friction tape offers superior grip. But it can be harder to handle. It can also collect dirt and wear out quickly.
Choose the tape that suits your style of play. Try different types to see what works best for you.
Preparing Your Stick
Preparing your hockey stick properly is crucial for effective play. A well-taped handle gives you better grip and control. Before you start taping, make sure your stick is ready.
Cleaning The Handle
Start by cleaning the handle of your hockey stick. Dirt and dust can affect the tape’s adhesion. Use a damp cloth to wipe the handle clean. Dry it thoroughly with a clean towel. You want the surface to be as smooth as possible.
Gathering Tools
Gather all the tools you need before starting. Here is a simple list:
- Hockey Tape: Choose a good quality tape.
- Scissors: For cutting the tape.
- Cloth: For cleaning the handle.
Having these tools ready makes the process easier. It also helps you achieve the best results.
| Tool | Purpose |
|---|---|
| Hockey Tape | Wrap the handle |
| Scissors | Cut the tape |
| Cloth | Clean the handle |
Once your handle is clean and your tools are ready, you can start taping your hockey stick.
Applying The Tape
Applying tape to the handle of a hockey stick is crucial for grip and control. Follow these steps to ensure a secure and comfortable handle. This process is simple but requires attention to detail.
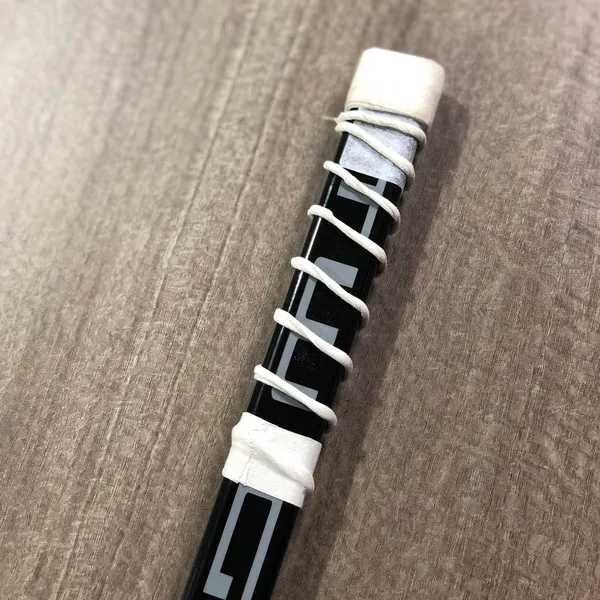
Starting The Wrap
Begin by selecting your preferred hockey tape. Black and white are common choices. Start wrapping at the top of the handle. Leave a small tab hanging over the edge. This helps to secure the tape and prevents it from unraveling.
Hold the tape roll in your dominant hand. Use your other hand to hold the stick. Start wrapping the tape around the top of the handle in a spiral motion. Ensure each wrap slightly overlaps the previous one. This creates a smooth, even surface.
Ensuring Consistency
Consistency is key for a comfortable grip. Maintain even tension on the tape as you wrap. This prevents wrinkles and ensures a firm hold. Keep the overlap uniform to avoid bumps.
Periodically check your progress. Make sure the tape is smooth and even. Adjust as necessary to maintain a consistent wrap. If you encounter any wrinkles or bubbles, unwrap that section and reapply.
Continue wrapping until you reach the desired length. Once you’ve reached the end, cut the tape and press down the edge to secure it. Finish by adding a few extra wraps at the base for added stability.
These steps will ensure your hockey stick handle is properly taped and ready for action.
Credit: carterhockey.com
Adding A Grip
Adding a grip to your hockey stick handle improves control. It reduces the chance of the stick slipping during play. This section will guide you on how to add a grip effectively. Let’s start with creating knobs and enhancing texture.
Creating Knobs
Knobs at the end of the handle provide better grip. Start by wrapping a strip of tape around the top of the stick. Build up layers until you have a small knob. This will act as a stopper for your top hand.
Make sure the knob feels comfortable. Test it by holding the stick as you would during a game. Adjust the size if needed. A well-sized knob prevents your hand from sliding off the stick.
Enhancing Texture
Textured grips improve handling. Start by wrapping the tape down the handle. Use a crisscross or spiral pattern. This creates ridges that enhance grip. Keep the tape tight to avoid loose ends.
Feel the handle as you go. Ensure the texture feels right for your grip. You can add more layers to increase the texture. This helps in sweaty conditions when the stick can become slippery.
Experiment with different textures. Find what works best for your play style. A good grip can make a significant difference in your control and performance.
Maintaining Your Tape Job
Maintaining your tape job on a hockey stick is crucial for performance. It ensures a good grip and control over the puck. Regular maintenance also extends the life of the stick. Here’s how to keep your tape job in top shape.
Repairing Worn Tape
Inspect your tape job before each game. Look for worn or frayed areas. Small issues can affect your grip. Use scissors to trim any loose ends. Apply a small strip of new tape over the worn spot. Press it down firmly to ensure it sticks well. This quick fix keeps the handle smooth and reliable.
Replacing Old Tape
Old tape loses its stickiness. It can also get dirty and affect your grip. Remove the old tape by peeling it off slowly. Start at the top and work your way down. Once removed, clean the handle with a cloth. Make sure it’s dry before applying new tape. Start at the top of the handle. Wrap the tape tightly in a spiral pattern. Overlap each layer slightly for a secure grip. Finish at the bottom and press down the tape to secure it.

Credit: www.goaliemonkey.com
Frequently Asked Questions
What Materials Are Needed To Tape A Hockey Stick Handle?
You need hockey tape, scissors, and a hockey stick.
How Do I Start Taping The Handle?
Begin at the top of the stick. Wrap the tape around tightly.
How Much Tape Should I Use?
Use enough tape to cover the handle completely. Usually, 8-12 inches.
Should I Overlap The Tape?
Yes, slightly overlap the tape. This ensures a secure grip.
How Do I Finish Taping The Handle?
Cut the tape. Press down the end to secure it.
Why Is Taping The Handle Important?
Taping provides better grip and control. It also protects the stick.
Can I Use Any Tape For A Hockey Stick?
No, use hockey tape. It is designed for durability and grip.
How Often Should I Re-tape My Hockey Stick Handle?
Re-tape when it starts to wear out. Usually, every few games.
Is There A Specific Taping Technique For Beginners?
Yes, keep it simple. Wrap evenly and tightly for a consistent grip.
Conclusion
Taping your hockey stick handle can improve your grip and performance. A well-taped handle ensures better control during the game. Always choose quality tape for durability. Follow the steps carefully for the best results. Personalize the grip to match your comfort and style.
Practice makes perfect, so keep trying. With time, you’ll tape like a pro. Enjoy your improved game experience with a well-taped stick. Happy playing!


