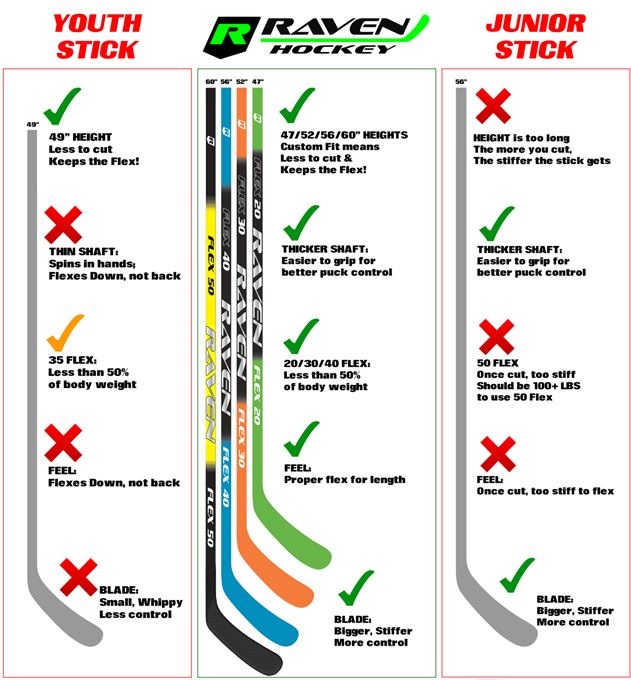
Cutting a hockey stick is a key skill for every player. It ensures the stick suits your height and playing style.
Hockey sticks come in standard lengths, but they aren’t one-size-fits-all. The right stick length improves your performance and comfort on the ice. Whether you’re new to hockey or refining your gear, knowing how to cut your stick correctly is vital.
In this guide, we’ll explore the steps to measure, mark, and cut your hockey stick. With the proper tools and a little care, you can customize your stick to fit you perfectly. Ready to get started? Let’s dive in and learn how to cut your hockey stick for the best results.

Credit: www.instagram.com
Choosing The Right Length
Choosing the right length of your hockey stick is crucial for your game. The stick length affects your comfort, control, and performance on the ice.
Importance Of Stick Length
The correct stick length can enhance your stick handling and shooting accuracy. A stick that is too long or too short can impair your gameplay. A well-chosen length ensures you can reach the puck efficiently and maintain a proper stance.
Here are some benefits of having the right stick length:
- Improved puck control
- Better balance and stability
- Enhanced shooting power
- Proper posture and stance
Measuring For The Perfect Fit
To find the perfect fit, you need to measure your stick properly. Follow these steps:
- Wear your hockey skates.
- Stand the stick vertically beside you.
- The stick should reach between your chin and nose.
For younger players or those new to the game, a stick that reaches the nose is ideal. Experienced players might prefer a stick that reaches the chin. This allows for better control and maneuverability.
Additionally, consider your playing position:
| Position | Recommended Length |
|---|---|
| Forward | Chin height |
| Defense | Nose height |
Choosing the right length is essential for improving your game. Take the time to measure correctly and you will see a difference in your performance.
Gathering Necessary Tools
Cutting a hockey stick to the right length can make a big difference in your game. Ensuring you have the right tools is crucial. This section will help you gather all the necessary equipment and take the right safety precautions.
Required Equipment
Before you start, make sure you have the following items:
- Hockey Stick: The stick you intend to cut.
- Measuring Tape: For accurate measurements.
- Marker or Chalk: To mark where you will cut.
- Hand Saw: A basic tool for cutting the stick.
- Sandpaper: To smoothen the cut edge.
Having these tools ready ensures a smooth and efficient process.
Safety Precautions
Safety should always be a priority. Follow these precautions:
- Wear Safety Goggles: Protect your eyes from sawdust and debris.
- Use Gloves: Guard your hands from sharp edges and the saw blade.
- Work in a Well-Lit Area: Ensure you can see clearly while cutting.
- Secure the Stick: Use a clamp or a vice to hold the stick steady.
These steps will help you avoid accidents and ensure a clean cut.
Once you have gathered all necessary tools and taken the safety precautions, you are ready to cut your hockey stick. This preparation will make the job easier and safer.
Marking The Stick
Marking the stick is a crucial step before cutting your hockey stick. Proper marking ensures your stick fits your height and playing style. It helps you maintain control and comfort during the game. Let’s dive into the process.
Finding The Ideal Cutting Point
Stand with your skates on and hold the stick upright. The top of the stick should reach your chin. This is a good starting point for marking. If you prefer a shorter stick, mark it at your collarbone. For a longer stick, mark it closer to your nose.
Using A Marker For Accuracy
Once you have found the ideal cutting point, use a marker to make a clear line. This helps ensure a precise cut. A bright marker works best for visibility. Make sure the line is straight and bold. This will guide your saw during the cutting process.

Credit: howtohockey.com
Cutting The Stick
Cutting a hockey stick to the right length is crucial for optimal performance. The right length ensures better control, improved handling, and a more comfortable grip. In this section, we will guide you through the steps to cut your hockey stick properly.
Using A Saw
To begin, you need a saw. A hand saw or a hacksaw works best. First, measure the desired length. Mark the spot with a pencil or tape. Place the stick on a stable surface. Use a clamp to secure it. This will prevent movement while cutting.
Start sawing at the marked point. Use smooth, even strokes. Apply gentle pressure. Do not rush. Cutting too quickly can splinter the stick. Take your time and ensure a clean cut.
Smoothing The Edges
After cutting, the edges will be rough. These rough edges can cause discomfort. You need to smooth them out. Use sandpaper or a file. Gently rub the cut end. Move in circular motions. This will smooth any splinters.
Check the edges with your hand. They should feel smooth. If not, sand more until satisfied. Clean off any dust or debris. Your stick is now ready for action!
Testing The Fit
Testing the fit of your hockey stick is crucial. It ensures optimal performance on ice. The right length impacts your reach, control, and shot accuracy. This section will guide you through the process of testing the fit.
Checking The Length On Ice
First, take your stick to the ice rink. Put on your full gear. Stand in your natural skating position. Hold the stick as you would during play. The top of the stick should reach your chin. If it doesn’t, adjustments are needed. This test mimics real-game conditions. It helps you see if the stick suits your style.
Making Final Adjustments
If the stick is too long, trim it. Use a saw to cut the excess length. Cut small amounts at a time. Re-check the length after each cut. This prevents cutting too much. If the stick is too short, consider adding an extension. Extensions are available at most sports stores. Tape the extension securely to avoid movement. Test the stick again on ice. Ensure it feels comfortable and balanced.

Credit: www.youtube.com
Frequently Asked Questions
What Tools Do I Need To Cut A Hockey Stick?
You need a saw, measuring tape, and a marker.
How Do I Measure The Correct Length?
Stand up straight with skates on. Mark at your nose level.
Should I Cut My Hockey Stick Before Taping?
Yes, cutting first ensures proper length for taping.
Can I Cut A Composite Hockey Stick?
Yes, use a fine-tooth saw for a clean cut.
How Much Should I Cut Off My Hockey Stick?
Cut off only what you marked. Usually, it’s a few inches.
Does Cutting A Hockey Stick Affect Its Performance?
Yes, shorter sticks offer better control; longer ones provide reach.
Can I Use A Hacksaw To Cut My Hockey Stick?
Yes, a hacksaw works well for clean cuts.
How Do I Smooth The Cut Edges?
Use sandpaper to smooth any rough edges.
Should I Cut My Stick If I Am Still Growing?
Consider leaving some length to accommodate growth.
Conclusion
Cutting a hockey stick correctly can improve your game. Measure carefully before cutting. Use the right tools for a clean cut. Sand the edges to avoid splinters. Testing on the ice helps find the perfect length. Practice makes perfect, so don’t rush the process.
Proper stick length enhances control and performance. Follow these steps and enjoy playing with a well-fitted stick. Happy hockey playing!


